搭建个人博客
工具
-
git
-
博客框架如hexo、hugo
-
npm
-
阿里云服务器、域名
-
github.io
Git
告诉bash要推送的是哪一个仓库
 git config --global user.email "you@example.com"
 git config --global user.name "Your Name"
 git config --list
设置ssh
##暂时没下载
先克隆到本地,本地修改后上传github
git clone
#若未设置公钥ssh,用https
git add .
git commit -m "XXX"
git push -u origin master
本地创建新的仓库再上传github
git init
git add .
git commit -m ""

#在Github中创建新的仓库

git remote add origin https://github.com/Dumbledore696/new_repo.git
git push -u origin master
hugo
-
windows下载hugo框架直接下载二进制文件
-
创建新博客,生成站点,注意文件夹目录
hugo new site myblog -
下载并设置主题
Complete List | Hugo Themes (gohugo.io)
###克隆主题到指定文件目录下 git clone https://github.com/xxx.git themes/soho -
本地启动个人博客
hugo server -t soho --buildDrafts##指定主题 -
新建文章
hugo new post/firstblog.md -
将个人博客部署到远端服务器
在github中建立一个远程仓库,仓库名为
用户名.github.io生成一个public文件,将public文件推到github中
hugo --theme=m10c --baseUrl="https://Dumbledore696.github.io/" --buildDrafts#在public文件下 git init git add . git commit -m "hogo博客第一次提交" git remote add origin https://github.com/Dumbledore696/Dumbledore696.github.io.git ##只在第一次时需要建立连接 git push -u origin master -
输入
https://dumbledore696.github.io/即可访问博客
自定义
-
设定文章的tag
#直接在文章的头部加入 tags : ["博客"] -
为About增加链接
在content\中加入about.md
注:可以借鉴主题demo对应的目录文件设置 -
文章显示图片
- 将图片放到根目录下的static下,这是网站的绝对路径,然后用
引用图片 - 比如

- 将图片放到根目录下的static下,这是网站的绝对路径,然后用
-
头像上传
将头像放到static目录下
-
购买域名
- 到https://mi.aliyun.com/购买域名并按照要求实名认证
- 在Github仓库中添加CNAME文件,文件中填写域名名称如
amazingdw.top - 进入设置,在Pages标签下找到Custom domain,添加上述域名并保存(可能已经自动添加了)
- 打开cmd,ping自己的域名,得到一个IP
- 打开域名控制台云解析 DNS (aliyun.com),在域名解析列表中选择解析设置,为域名添加两条记录
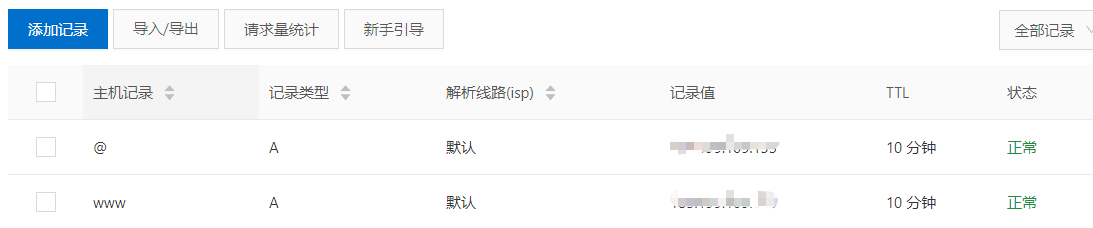
- 接下来就可以通过访问www.amazingdw.top 或者 amazingdw.top 访问个人博客
Tips
- md文件和网站是实时同步的,不需要刷新